
“Roast chicken in the Egg is great, but I miss having gravy” said my wife. This was indeed the case … spatchcock chicken cooked in our smaller Big Green Egg makes for a great dinner, however fresh gravy wasn’t feasible. Another challenge was cooking something big on the lower level.
After pondering this, I came up with a simple solution, a Minimax Rig 2.0. I just needed to cannibalise three of my wife’s meat skewers.
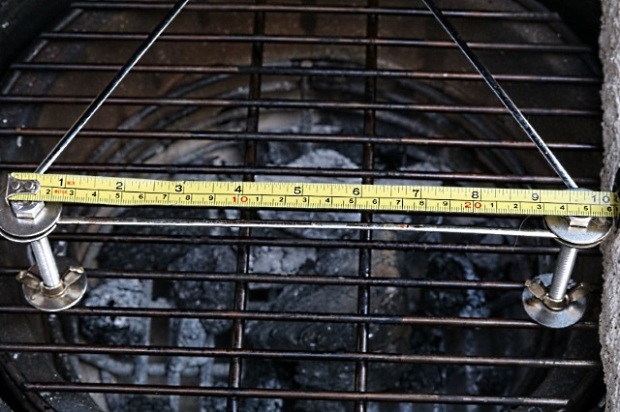
The Original Minimax Rig 1.0
With the original setup from last year, when roasting chicken on the top level the supporting bolts sit in a drip tray catching juices for gravy underneath. Over time the bolts got gunked up, and I don’t want that grease in our gravy:

Also the bolts got in the way when I wanted to cook something big (or a few items) on the lower level. The picture below shows cooking four thick pork chops. I had to use the top level for one of them (I had wanted to smoke some Romano peppers as well) as the supports were obstructive:

And lastly, the top grid was permanently attached to the bolts, so it wasn’t easy to remove and manipulate. It would be better if I could remove the grid without the bolts coming with it.
The New and Improved Design

The new and improved setup addresses these issues. It is made using the items listed below, all stainless steel:
- 3 x M8 80mm flat hex head bolts
- 6 x M8 A2 standard nuts
- 3 x M8 A2 wing nuts
- 9 x M10 penny washers … M8 can be used, however I found the extra width of M10s made the setup easier to put together.
- 3 x flat BBQ skewers, minimum length 10 inches (not including the circular handle)
They are available from Amazon (affiliate links) or your local hardware store. You’ll need a couple of spanners and a tool to cut through the skewers, I used a garden lopper. You also need a stainless steel grid, I used the Big Green Egg mini grid. Other grids will work, as long as the diameter is 26cm/10 inches and the gap between the grids is ~0.5 inch.
The method to make the new setup is below, steps 3 and 4 are a bit fiddly, but once they are done the rest comes together easily.
- Cut the circular handles from the skewers and trim each to 10in/26cm metal rods to create support bars.

- Create three legs by adding two washers and a standard nut to each bolt.

- Place two support bars between the washers on one leg, either side of the bolt. Hand-tighten the nut, then fan out the rods until there is roughly a 60° angle between them. Place the leg hex side down on a surface, tighten the nut a little more.

- Place the third support bar between the first two to make a triangle. Then carefully add the two remaining legs into the framework, leaving the bolts untightened. Alter the layout until from overhead it looks like each angle is equal and that the distance between the outside of the bolts is no more than 10 inches.


- Carefully hand tighten the nuts by hand and then a little with a spanner. Add a wing nut, washer and standard nut to the base of each leg to form the feet.

- Turn the framework over and fit in the top cooking grid. Carry out final adjustments so that the grid fits snugly on the top level between the three supports. Then tighten the nuts securing the rods between the washers to make the rig solid.

- Place the framework into the Egg, ensuring that the lid closes, the supports are inside the fire ring and a tray fits underneath. Both my Weber small basket
 and Big Green Egg drip trays fit, although the latter is too wide to slide in and out. When I use it, I lift the framework on and off.

Wing nuts are used so that the platform height can be raised and lowered easily (to accommodate what is being cooked on the top level) by adjusting the position of the washer at the base of the supports. If any of the supports are touching the fire ring, the height will not be adjustable. Ensure that the supports are less than 10 inches apart:
When you’re using this setup, make sure that what you plan to cook will actually fit before lighting the coals. I speak from experience on this point. 🙂
With this setup, I can now get a drip tray (e.g. the Big Green Egg one) underneath an entire spatchcocked chicken, and voila – we have fresh gravy! I can also remove the top grid easily, either to move what is being cooked on the top level or to use the grid somewhere else.

Temperature Gauge Position
As there is a second level, the temperature gauge needs to be set up differently so that neither it nor the clip touch the food. Remove the clip from the inside (it’s not needed) and using part of a cork as a spacer on the outside.

Stainless Steel, Galvanised and Zinc
I used stainless steel materials. There are those that claim zinc/galvanised items should be avoided as zinc fumes are poisonous. Others counter, stating they have been using zinc-plated steel for years and aren’t dead yet, nor even have a headache.
The facts are that zinc boils at 907°C/1664°F which a BGE shouldn’t get to. Zinc does however melt at 419°C/787°F and I have had an egg close to that … although only for cooking pizza, using fire bricks. Even so, I went for stainless steel components.
It’s a personal choice.

After seeing this I had to try Spatchcock chicken in my MiniMax. Used the home made raised grid rig which was pretty much a copy of the one above with a 13″ grid instead of a 10″. Used Herbs De Provence on this 4.5 pound chicken and put a drip pan underneath.
45 minutes later it looked like this:
Rotated the rig to finish the cook.
Pulled the chicken off along with the drippings and let the bird rest while I made gravy.
Served chicken with jasmine rice, wax beans and gravy for me.
Dark meat and the breast meat were really moist. Enjoyed how fast this cook was.
LikeLiked by 1 person
Great cook! Surprised that a 13 inch grid works, good to know.
LikeLike
Thank you for the Mini Max Rig 2.0, followed it to the T and it turned out amazing!! Thank you so much for sharing it!! Take care and Happy Holidays,
LikeLiked by 1 person
I’m so glad that you are enjoying the 2.0 rig, it was my pleasure to share around the Minimax community. Have a great Christmas and New Year!
LikeLike
Hoping the folks at a big a green aegg realize this little gem is severely under-accessorize. We all post our work arounds.
LikeLiked by 1 person
Why do we Minimax owners have to build our own accessories? BGE, where are you?
LikeLiked by 1 person